Swap
This section shows how to use the Raydium SDK to swap tokens for mainnet and devnet. The swap operation will use Liquidity.makeSwapTransaction from the Raydium SDK, which performs swaps on a single pool (e.g. swap RAY to USDC via the RAY-USDC pool). For
Credit goes to Rayxury from Raydium's developers' discord for creating and sharing these examples on Github.
Devnet
This section steps through a brand new devnet wallet installation that is airdropped SOL, USDC, and Ray tokens. The SDK is then used to swap USDC into RAY using the RAY-USDC pool.
1. Wallet Install
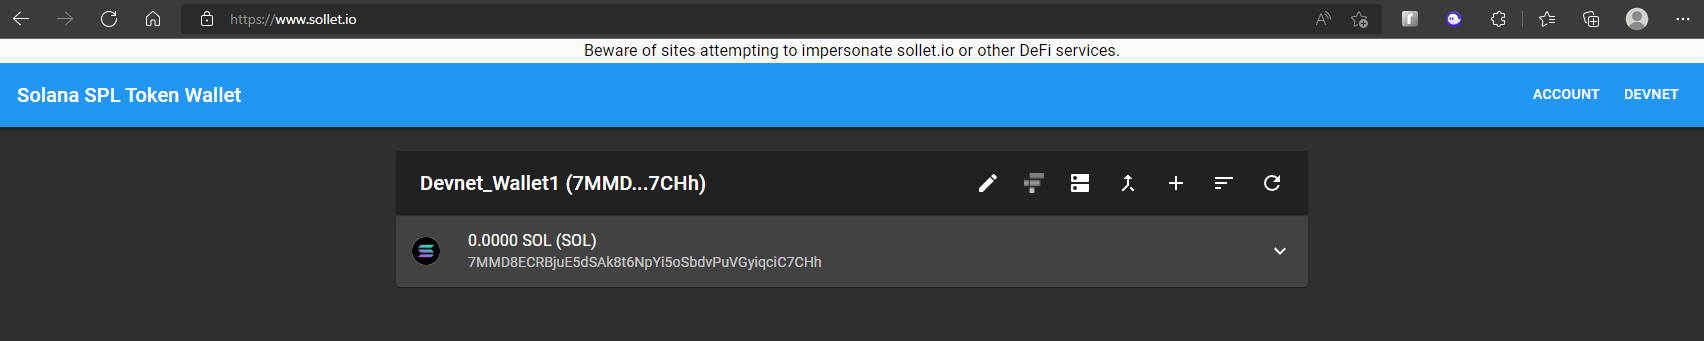
Any devnet compatible wallet should work but this guide will show usage with Serum's Sollet.io wallet. As a first step, visit https://www.sollet.io to create a new wallet for devnet and follow the on-screen instructions.
Once created, the wallet should show up like the following:
2. Switch to devnet
At the top right of the Sollet wallet, select the network and switch to https://api.devnet.solana.com

3. Airdrop SOL
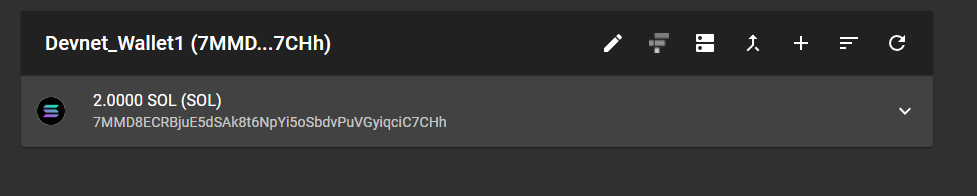
Airdrop SOL to your devnet wallet. The SOL token will be used in subsequent transactions.
- Navigate to https://www.spl-token-ui.com
- Ensure you've selected devnet in the top right navigation bar dropdown

- Fill out the SOL address using the address from step 2 and put 2 for the amount of SOL to airdrop. It may require a few tries before you see the SOL in your wallet. While 10 SOL is the max that can requested at once, it may not always deliver, so you may have to try smaller amounts like 2 or 3, and attempt it a few times.
note
The spl-token-ui.com is open sourced at https://github.com/paul-schaaf/spl-token-ui
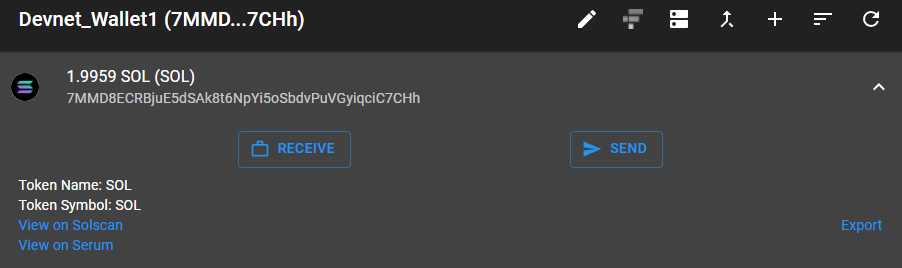
- Once the airdrop is successful, you should see the SOL token in your wallet:
4. Add USDC and Ray to your wallet
In devnet, unlike mainnet, we need to manually add the USDC and Ray tokens so they're visible in your wallet.
- In the Sollet wallet, click the "Add Token" button

- Ensure the Manual Input tab is selected
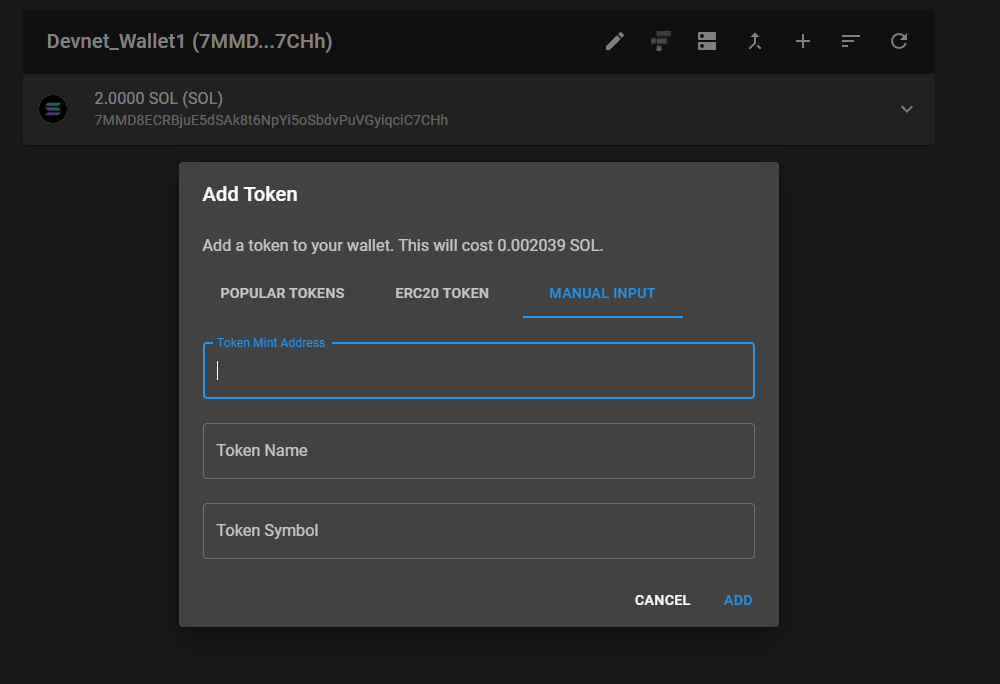
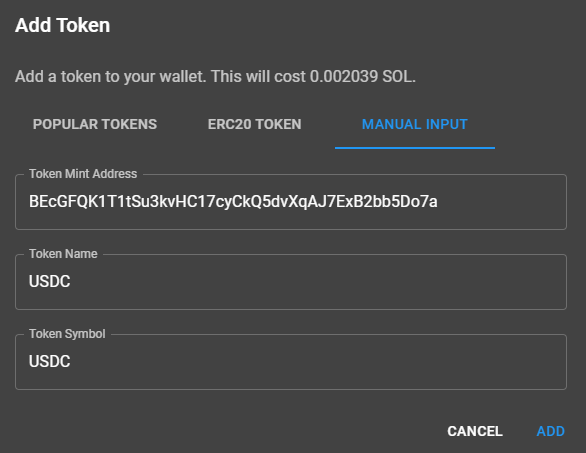
- Add USDC:
Token Mint Address: BEcGFQK1T1tSu3kvHC17cyCkQ5dvXqAJ7ExB2bb5Do7a
Token Name: USDC
Token Symbol: USDC
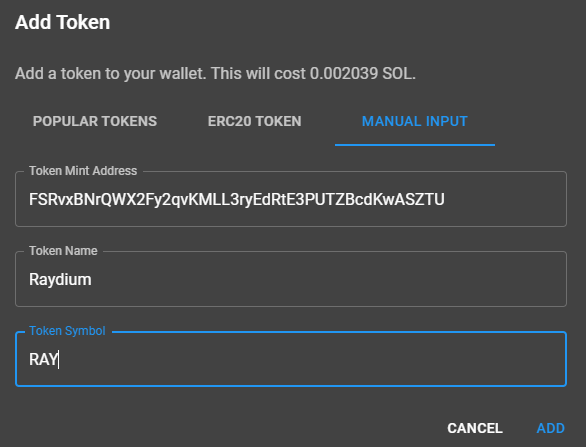
- Add RAY:
Token Mint Address: FSRvxBNrQWX2Fy2qvKMLL3ryEdRtE3PUTZBcdKwASZTU
Token Name: Raydium
Token Symbol: RAY
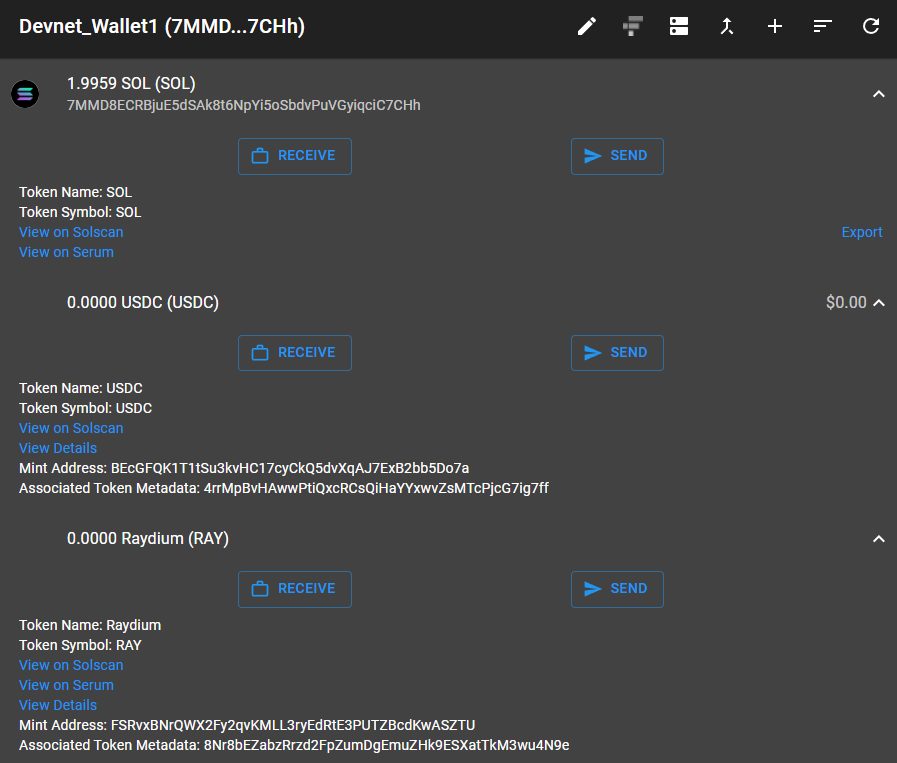
- After adding the tokens, you may need to refresh your wallet but this should appear like the following after expanding the details:
note
Take note of the "Associated Token Metadata" addresses as they will be used to airdrop tokens in Step 5.
5. Airdrop USDC and Ray to your wallet
Now we will airdrop USDC and Ray to your wallet.
- Navigate to https://www.spl-token-ui.com
- Select "devnet" from the top right navbar
note
If you forget this step or enter an invalid address, you may encounter an error like
"Error calculating mint address from token account. Are you sure you inserted a valid token account address"
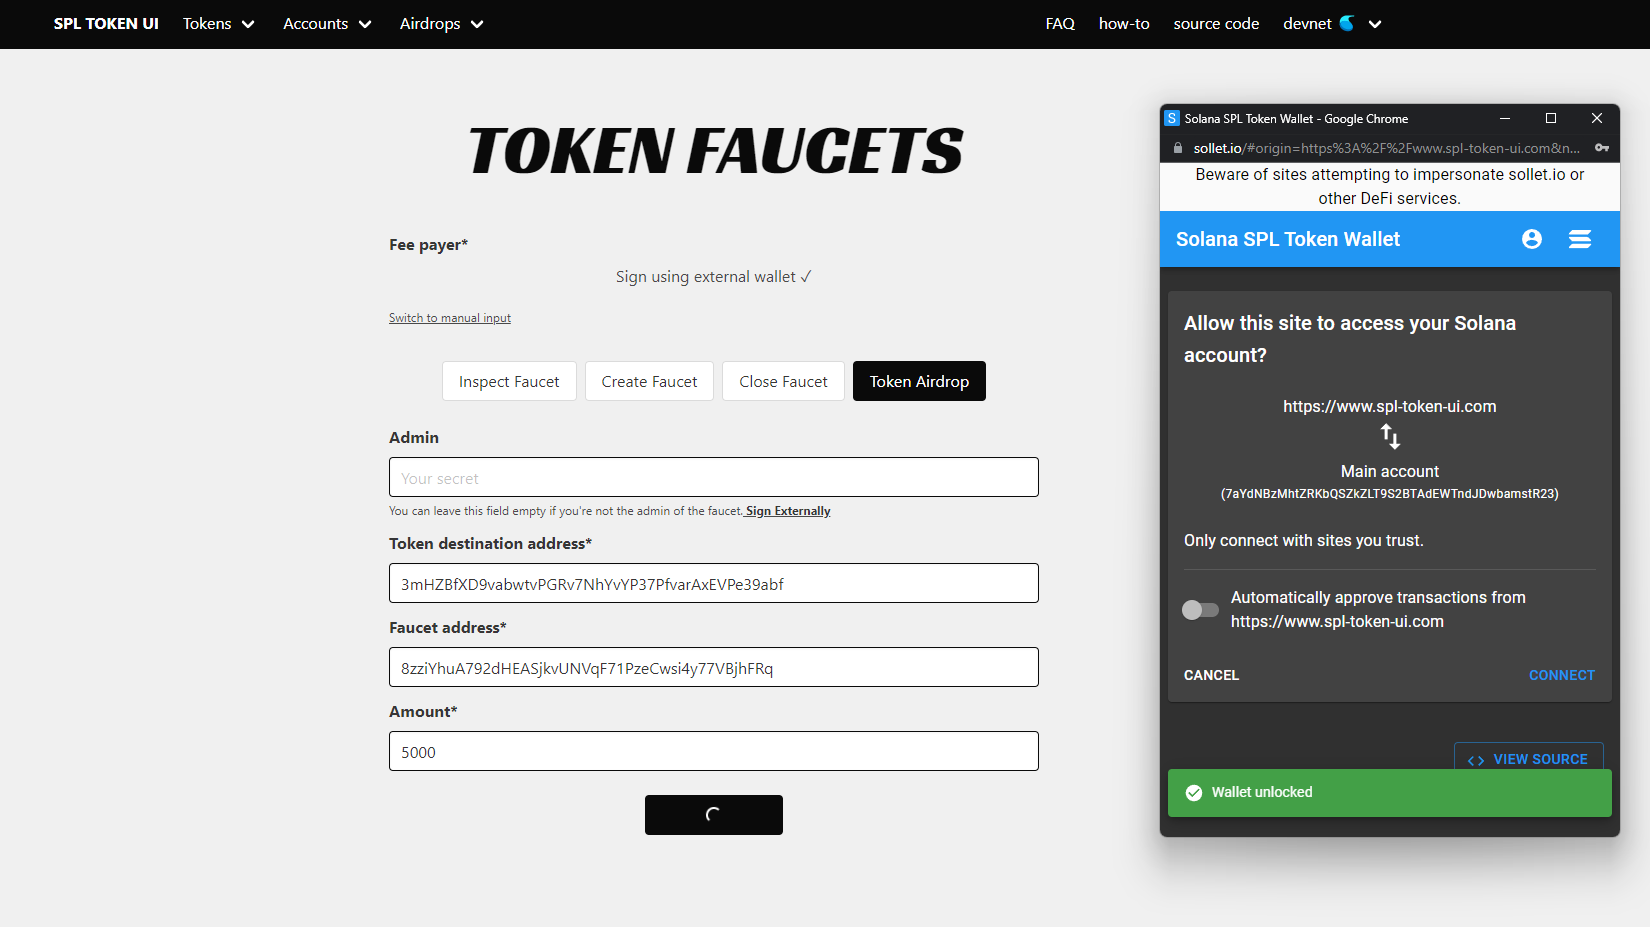
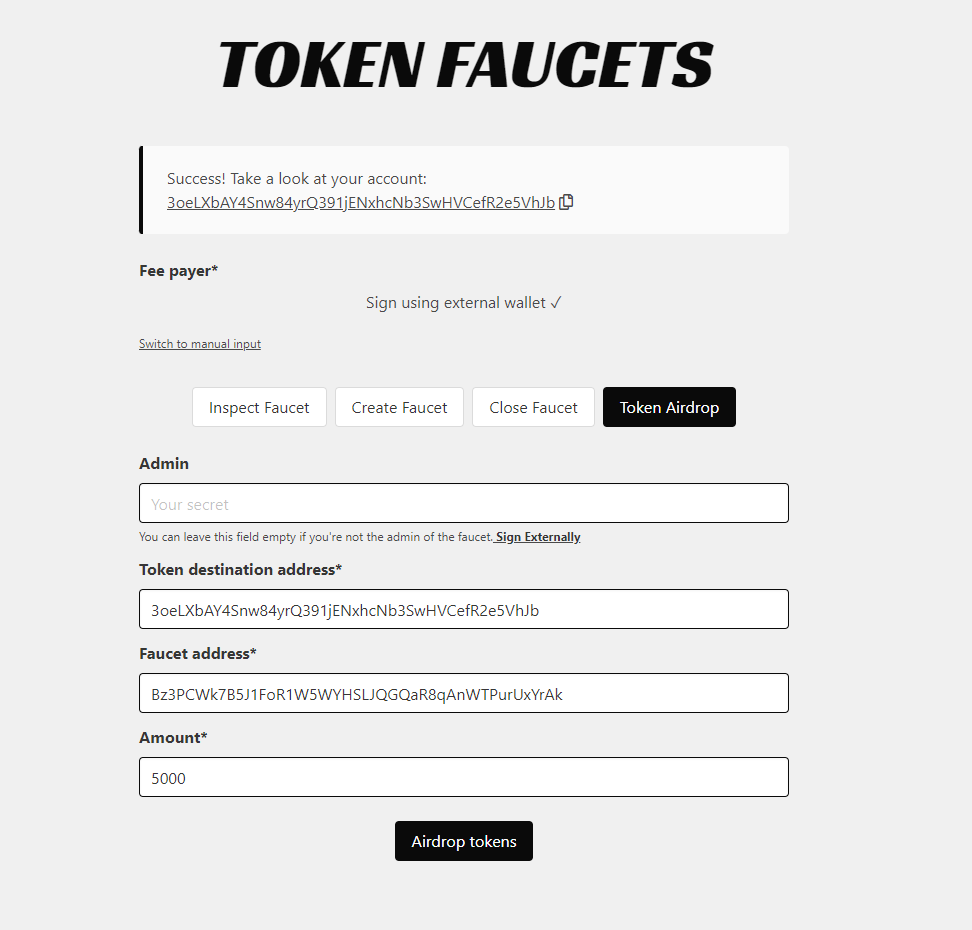
- Select the "Token Airdrop" button
- In order to airdrop USDC to your wallet, you should enter the following for the inputs:
- Token destination address: This is the "Associated Token Metadata" address from step 4
- Faucet Address: This is the USDC faucet address Amount:
Here's some example fields for USDC:
Token destination address: 4rrMpBvHAwwPtiQxcRCsQiHaYYxwvZsMTcPjcG7ig7ff
Faucet address: Bz3PCWk7B5J1FoR1W5WYHSLJQGQaR8qAnWTPurUxYrAk
Amount: 100000
Here's examples fields for RAY:
Token destination address: 8Nr8bEZabzRrzd2FpZumDgEmuZHk9ESXatTkM3wu4N9e
Faucet address: 8zziYhuA792dHEASjkvUNVqF71PzeCwsi4y77VBjhFRq
Amount: 100000
note
The amount of 100,000 equates to 0.10 USDC or 0.10 RAY. At the time of this writing, values greater than 100,000 appear to fail with the following error:
failed to send transaction: Transaction simulation failed: Error processing Instruction 0: custom program error: 0x4 "Error calculating mint address from token account. Are you sure you inserted a valid token account address"
- For the Sollet wallet, you will be prompted to allow access to the https://www.spl-token-ui.com website with a browser window popup, so press "Connect" when it appears
After pressing "Connect", you'll then be prompted to approve the swap transaction:
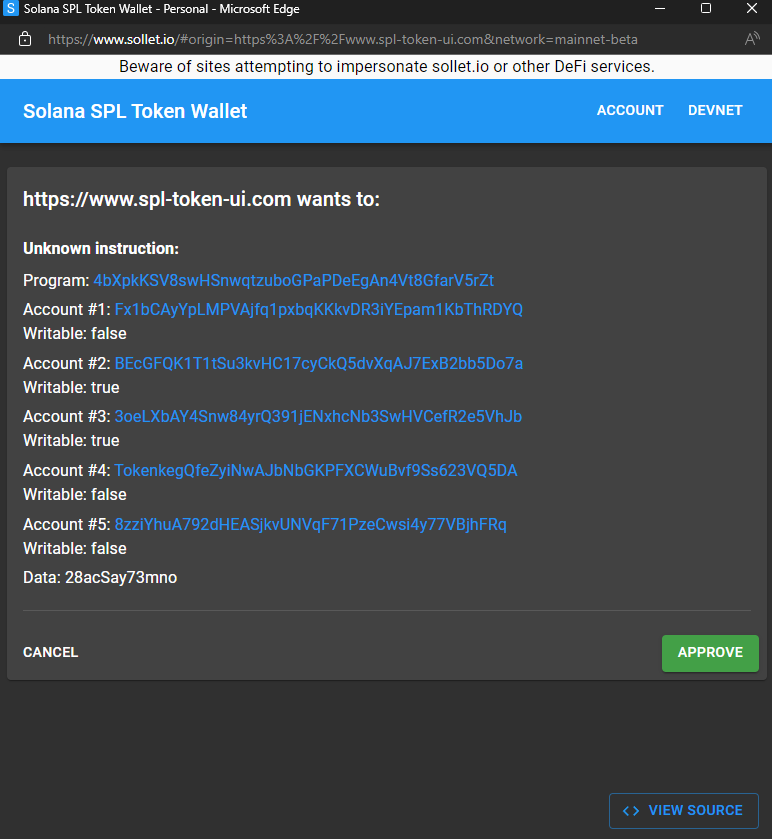
After approving you'll hopefully see a successful transaction
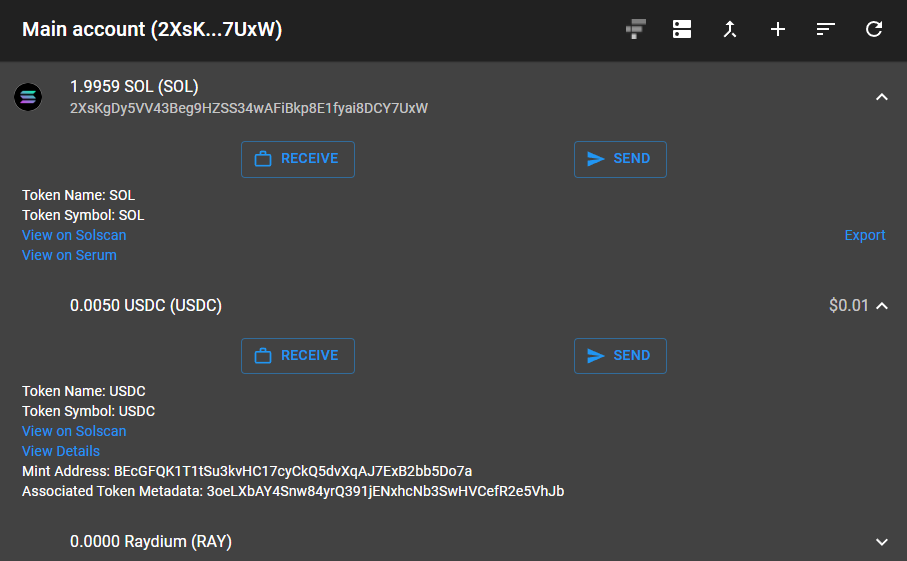
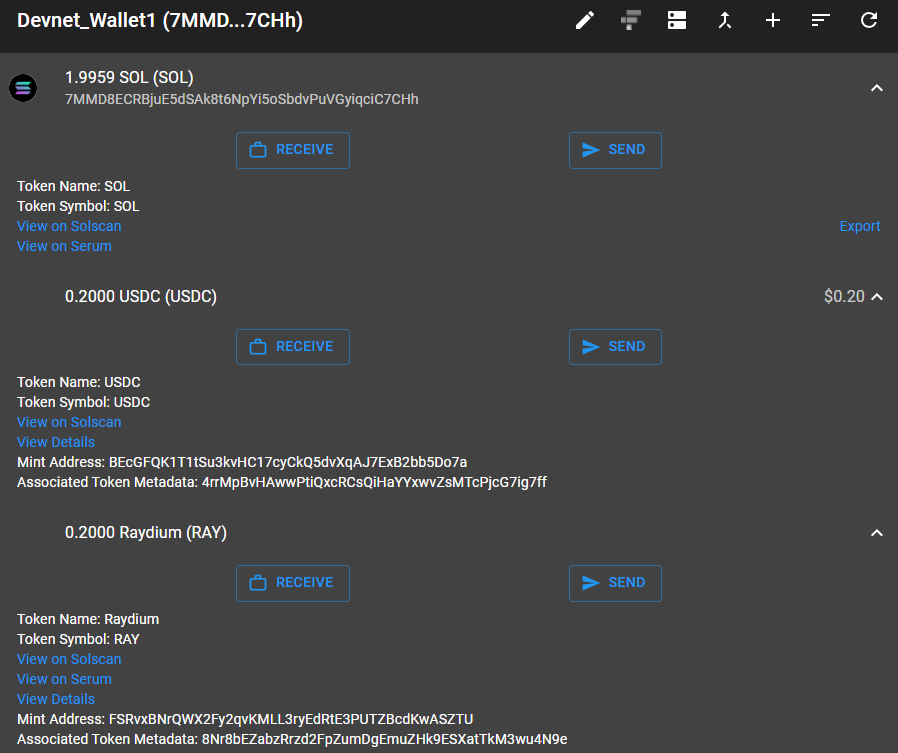
Next if you check your wallet you should see an updated balance for the tokens you airdropped:
- After pressing "Connect", you'll then be prompted to approve the swap transaction:
- Finally, you hopefully see a successful transaction
- After you've airdropped a number of tokens, you should see updated balances in your wallet:
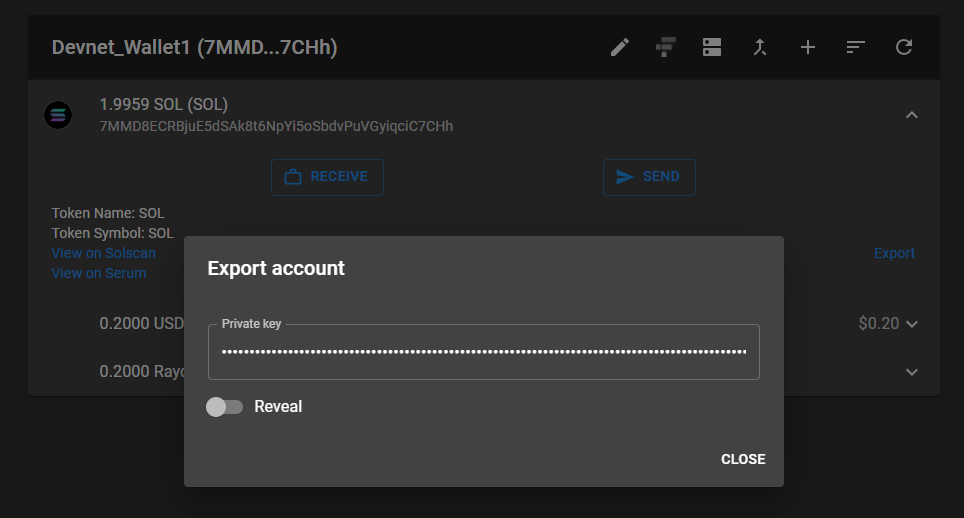
6. Save wallet private key
This wallet's private key will be needed in order to programatically make calls. To get the private key, which is an array of numbers, click the "Export" button in the Sollet wallet.
7. Execute Swap
This section will show how we can swap tokens programatically with a demo utilizing the Raydium SDK.
- Git clone the sdk_demo repo and build it
# Clone the repo demo
git clone https://github.com/raydium-io/sdk_demo/

# As sdk_demo is an evolving project, this tutorial will focus on a particular verison from May 2, 2022
git checkout e14585ef5d31c909ab0b9506b4679acbf3816227

# Build dependencies
yarn
- Modify src/swap_dev.ts with your wallet's private key
Open src/swap/swap_dev.ts and update the secretKey using your wallet's private key from step 6:
// Replace '[1,1,1,1,1]' with your key
const secretKey = Buffer.from(JSON.parse("[1,1,1,1,1]"));
- Modify src/swap_dev.ts to swap USDC into RAY
For the POOL_ID, comment out SOL-USDT and instead use RAY_USDC
// SOL-USDT
// const POOL_ID = "384zMi9MbUKVUfkUdrnuMfWBwJR9gadSxYimuXeJ9DaJ"

// RAY_USDC
const POOL_ID = "ELSGBb45rAQNsMTVzwjUqL8vBophWhPn4rNbqwxenmqY";
- Modify src/swap_dev.ts to use a different amount
Update the amountIn from 1,000,000 to 100, or else the transaction will likely fail unless you have enough USDC in your wallet.
const amountIn = new TokenAmount(new Token(poolKeys.baseMint, poolInfo.baseDecimals), 100);
- Execute the devnet swap
yarn dev
The program should hopefully run successfully with output similar to the following
7MMD8ECRBjuE5dSAk8t6NpYi5oSbdvPuVGyiqciC7CHh
tokenAccounts.length: 2
allPoolKeys.length: 21
...
0.000997 0.000949 9.978050 9.970000 0.08 0.000000
https://explorer.solana.com/tx/VRw6ZCZ1uzBSBdCXEhN6o2rz3CsqmQSKyNdW9UGK2B7WyfouhBJ6XQU5DEonpYFTN83woxVg3zMG1yVW2EGvoLe?cluster=devnet
Done in 7.52s.
You can see a successful swap here
8. Verify the swap transaction
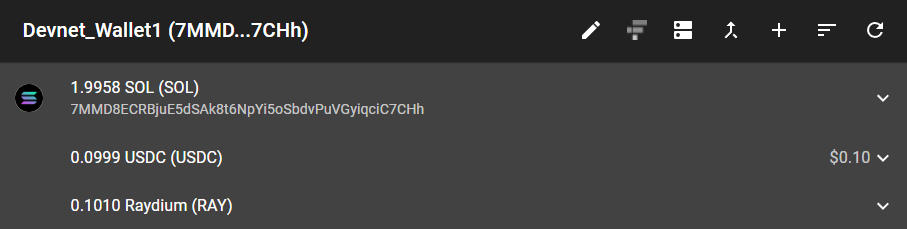
Finally, you can verify that USDC was swapped into RAY by looking at your wallet:
Here is an example where 0.001 USDC was swapped into 0.001 RAY. Originally the wallet had 0.1 USDC and 0.1 RAY before the swap:
Mainnet
This section will show a swap between RAY and USDC for mainnet. It differs from the devnet version in that it uses real tokens.
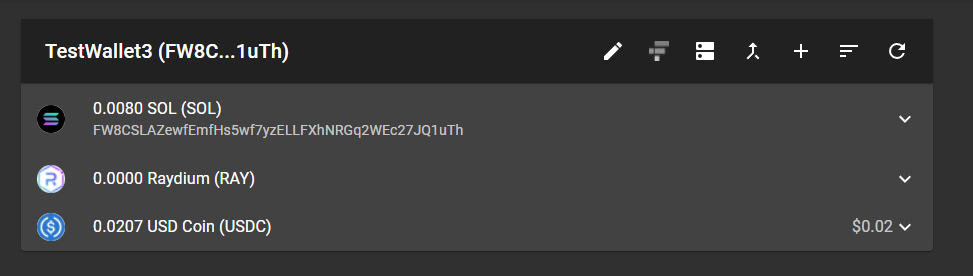
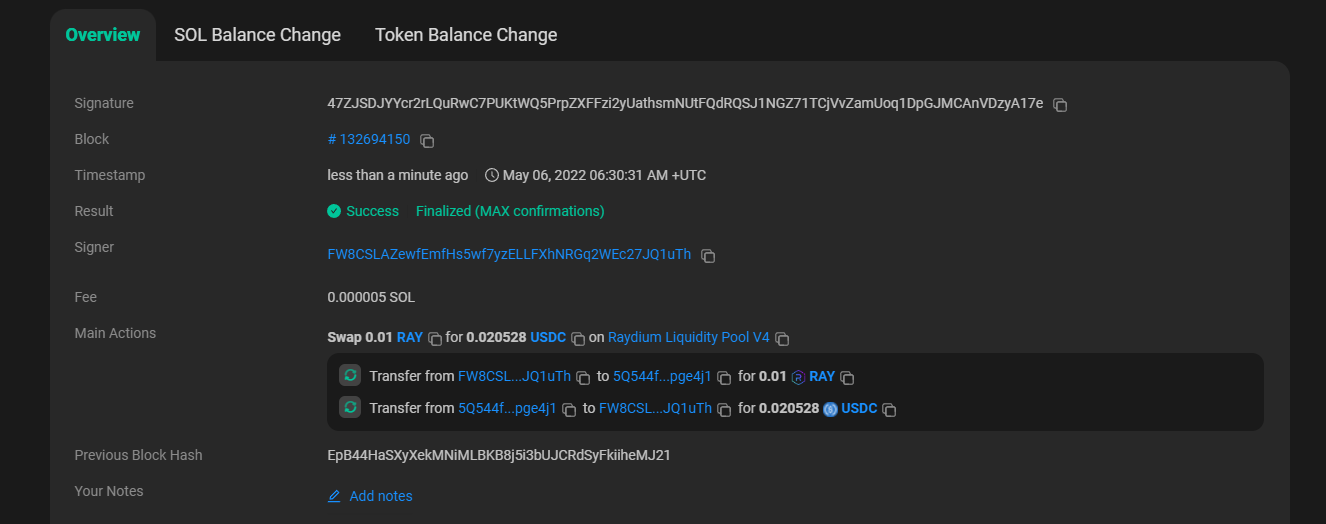
While mainnet may initially seem off-putting because it's using real assets, for swaps it can be fairly affordable for testing. For example, the following section will demonstrate a successful swap of 0.01 Ray with 0.020528 USDC.
The successful transaction can be viewed here.
To swap your own assets, please follow the remaining steps in this section.
1. Transfer SOL and RAY to Wallet
The first step before running the mainnet swap demo is to transfer SOL and RAY to your wallet. It may be advisable to create a new wallet for development / testing purposes (see here for reference if needed). The cheapest example may be 0.01 RAY and 0.001 SOL for transactions.
2. Save wallet private key
The swap demo will require your wallet's secret key to perform a transaction. If using Sollet, see here to export a private key that's an array of numbers.
3. Clone and modify sdk_demo repo
Clone the sdk_demo repo and checkout the version used by this example
git clone https://github.com/raydium-io/sdk_demo/
git checkout a5bdf75f80d2fb6dcabd80b9492c63319ec6cccd
Modify the swap.ts with the wallet private key retrieved from step 2 and update the amountIn value based on the amount you want to swap (in this example we're using 100)
import { Connection, Keypair, PublicKey } from "@solana/web3.js";
import { Liquidity, Token, TokenAmount, Percent } from "@raydium-io/raydium-sdk";

import { getTokenAccountsByOwner, fetchAllPoolKeys, fetchPoolKeys } from "./mainnet";

// @ts-ignore
import bs58 from "bs58";

(async () => {
  const connection = new Connection("https://solana-api.projectserum.com", "confirmed");

  // change to your privateKey
  const secretKey = Buffer.from(JSON.parse("1,1,1,1,1]"));
  const ownerKeypair = Keypair.fromSecretKey(secretKey);
  const owner = ownerKeypair.publicKey;
  console.log(owner.toString());

  const tokenAccounts = await getTokenAccountsByOwner(connection, owner);
  const RAY_USDC = "6UmmUiYoBjSrhakAobJw8BvkmJtDVxaeBtbt7rxWo1mg";

  const poolKeys = await fetchPoolKeys(connection, new PublicKey(RAY_USDC));
  if (poolKeys) {
    const poolInfo = await Liquidity.fetchInfo({ connection, poolKeys });
    // Update the 100 to the amount you want to swap
    const amountIn = new TokenAmount(new Token(poolKeys.baseMint, 6), 100);
    const currencyOut = new Token(poolKeys.quoteMint, 6);
    const slippage = new Percent(5, 100);

    const { amountOut, minAmountOut, currentPrice, executionPrice, priceImpact, fee } = Liquidity.computeAmountOut({
      poolKeys,
      poolInfo,
      amountIn,
      currencyOut,
      slippage,
    });

    //@ts-ignore
    console.log(
      amountOut.toFixed(),
      minAmountOut.toFixed(),
      currentPrice.toFixed(),
      executionPrice.toFixed(),
      priceImpact.toFixed(),
      fee.toFixed(),
    );
    const { transaction, signers } = await Liquidity.makeSwapTransaction({
      connection,
      poolKeys,
      userKeys: {
        tokenAccounts,
        owner,
      },
      amountIn,
      amountOut: minAmountOut,
      fixedSide: "in",
    });

    const txid = await connection.sendTransaction(transaction, [...signers, ownerKeypair], { skipPreflight: true });

    console.log(`https://solscan.io/tx/${txid}`);
  }
})();
4. Execute swap
Next, you can run the program to execute the swap
# Build the project and its dependencies
yarn

# Run the swap for mainnet
yarn start

# Hopefully you see a success like the following
ts-node src/swap.ts
FW8CSLAZewfEmfHs5wf7yzELLFXhNRGq2WEc27JQ1uTh
0.000205 0.000195 2.057025 2.050000 0.34 0.000000
https://solscan.io/tx/3DrVnvJDe71NRYRzJuYsVdgxdUrESUbHznPTeh1AoXTcQ9gzB8cNcxMnm3C3SxR4CE6FDrsKCwNiCXWfCRfdxDQG
Done in 9.64s.
5. Verify swap
The swap can be verified on solscan but additionally your wallet should show a successful swap: